
Vendure Plugin for generating PDF invoices
npm install @pinelab/pinelab-invoice-pluginVendure Plugin for generating PDF invoices
Section titled “Vendure Plugin for generating PDF invoices”A plugin for generating customizable PDF invoices for orders. Supports incremental invoice numbering, credit invoices, and customizable Handlebars templates.
Migration from V3.x to V4.0.0
Section titled “Migration from V3.x to V4.0.0”In v4 the field invoice.isCreditInvoice was changed from a getter to a physical database column. To populate the column you need to:
- Back up your database!
- Install the invoices plugin v4.x and generate + run a database migration. This introduced the new database field
isCreditInvoicewhere all values are ‘false’. - Run the query
UPDATE invoice SET isCreditInvoice = 1 WHERE orderTotals LIKE '%total":-%';to set the value to ‘true’ for invoices that have a negative total. - :warning: The plugin now uses Puppeteer, so your Docker image might need additional dependencies installed. See Getting Started below!
Getting started
Section titled “Getting started”- Install the plugin with
yarn add @pinelab/pinelab-invoice-plugin - Add the following config to your
vendure-config.ts:
import { InvoicePlugin } from '@pinelab/pinelab-invoice-plugin';
plugins: [ InvoicePlugin.init({ // Used for generating download URLS for the admin ui vendureHost: 'http://localhost:3106', }),];- Run a migration, to add the Invoice and InvoiceConfig entities to the database.
- Start Vendure and login to the admin dashboard.
- Make sure you have the permission
AllowInvoicesPermission - Go to
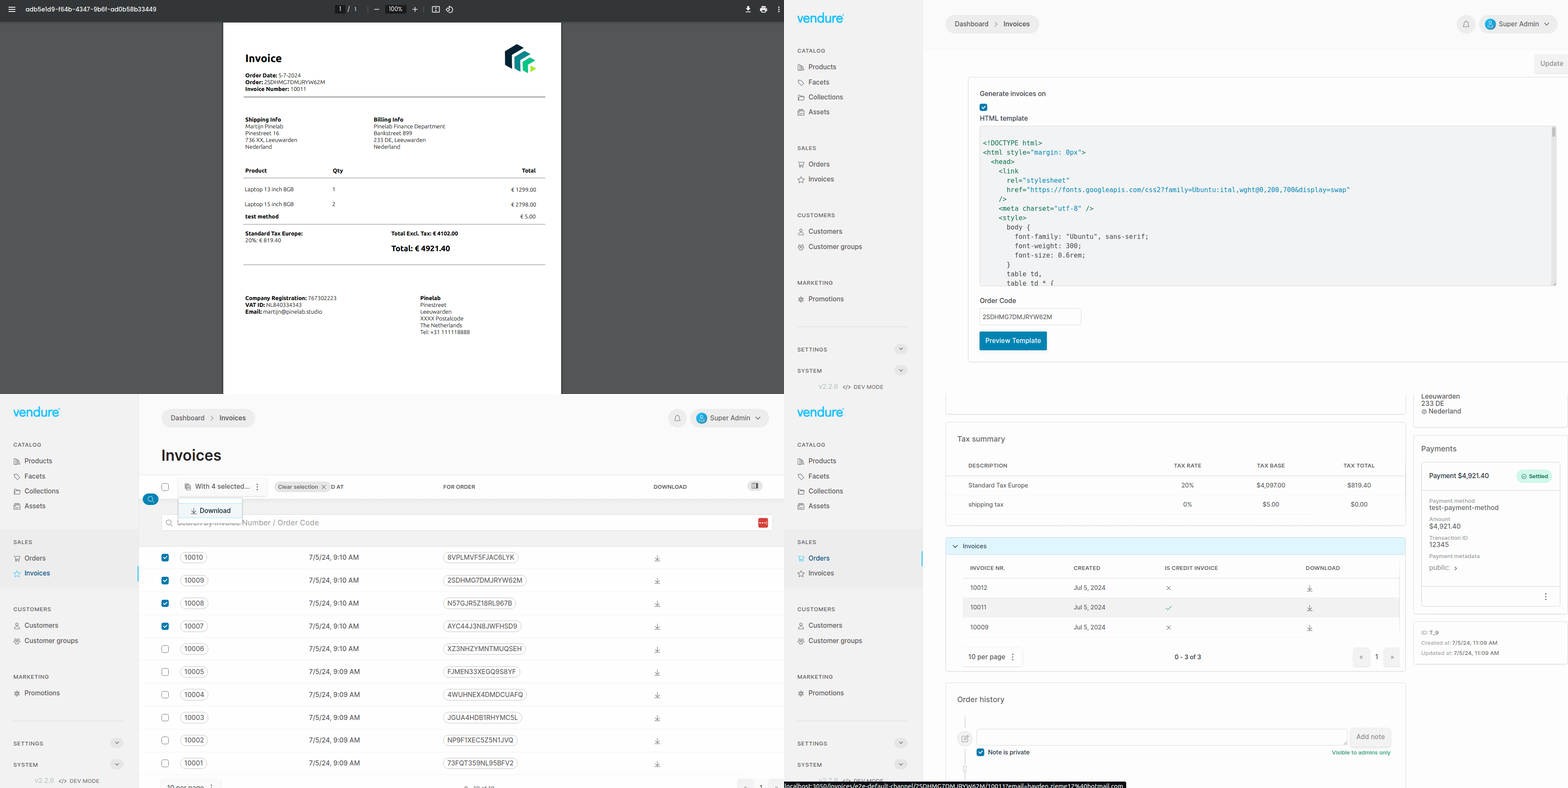
Sales > Invoicesto see all generated invoices. The order detail page will have generated invoices for that order only. - Go to
Settings > Invoicesto enable invoice generation and edit the invoice handlebars template. - Check the checkbox to
Enable invoice generationfor the current channel on order placement. Invoices are generated on order placement. - A default HTML template is set for you. Click the
Previewbutton to view a sample PDF invoice.
Running in Docker / production
Section titled “Running in Docker / production”Puppeteer bundles its own Chromium binary, which is downloaded during npm install. This can be unreliable in containerized environments: the download may silently fail on certain base images, behind proxies, or in air-gapped CI. When the bundled binary is missing at runtime, invoice generation fails with Could not find Chrome.
The recommended approach is to install system Chrome and tell Puppeteer to use it via the PUPPETEER_EXECUTABLE_PATH env var. This is more reliable, produces smaller images, and avoids the postinstall download entirely.
FROM node:24
WORKDIR /usr/src/app
# Skip Puppeteer's bundled Chromium download — we use system Chrome insteadENV PUPPETEER_SKIP_DOWNLOAD=trueENV PUPPETEER_EXECUTABLE_PATH=/usr/bin/google-chrome-stable
# Install Google Chrome Stable and required dependenciesRUN apt-get update \    && apt-get install -y wget gnupg \    && wget -q -O - https://dl-ssl.google.com/linux/linux_signing_key.pub \       | gpg --dearmor -o /usr/share/keyrings/googlechrome-linux-keyring.gpg \    && echo "deb [arch=amd64 signed-by=/usr/share/keyrings/googlechrome-linux-keyring.gpg] \       https://dl-ssl.google.com/linux/chrome/deb/ stable main" \       > /etc/apt/sources.list.d/google.list \    && apt-get update \    && apt-get install -y --no-install-recommends \       google-chrome-stable \       fonts-ipafont-gothic fonts-wqy-zenhei fonts-thai-tlwg fonts-khmeros fonts-kacst fonts-freefont-ttf \       libxss1 dbus dbus-x11 \    && rm -rf /var/lib/apt/lists/*
COPY . .RUN npm installRUN npm run build
CMD [ "npm", "run", "start" ]
Note:
--no-sandboxis required when running Chrome as root inside a container. The plugin passes this flag by default. If you run as a non-root user, you can remove it viapuppeteerLaunchOptions.
Custom Puppeteer launch options
Section titled “Custom Puppeteer launch options”You can customize how Puppeteer launches Chrome in two ways. Both are fully backward compatible — when neither is set, the plugin uses its defaults (headless: true, args: ['--no-sandbox']).
Option 1: Plugin config (recommended for most cases)
InvoicePlugin.init({ vendureHost: 'https://my-vendure.example.com', puppeteerLaunchOptions: { executablePath: '/usr/bin/google-chrome-stable', args: ['--no-sandbox', '--disable-gpu'], timeout: 60000, },});Any Puppeteer launch option can be passed here. The plugin merges your options over its defaults (your values win).
Option 2: PUPPETEER_EXECUTABLE_PATH env var
PUPPETEER_EXECUTABLE_PATH=/usr/bin/google-chrome-stableThis env var is Puppeteer’s standard convention. It takes the highest precedence — even over executablePath set in puppeteerLaunchOptions. This is useful for overriding the Chrome path per environment (e.g. different paths in CI vs production) without changing code.
Adding invoices to your order-confirmation email
Section titled “Adding invoices to your order-confirmation email”Add the following link to your email template:
https://<your server>/invoices/e2e-default-channel/C7YH7WME4LTQNFRZ?email=hayden.zieme12@hotmail.com.
When the customer clicks the link, the server will check if the ordercode, channelCode and customer emailaddress
match with the requested order. If so, it will return the invoice.
This link will always return the first invoice generated for an order. If invoices were recreated via the Admin UI, you can specify the invoice number in the url.
Recreating invoices and credit invoices
Section titled “Recreating invoices and credit invoices”On the order detail page you can click the button recreate invoice to generate a new invoice based on the current state of the order.
By default, this will first create a credit invoice, then a new invoice. A credit invoice basically voids the previous invoice before generating a new one.
To send emails when new invoices are created, you can listen for InvoiceCreatedEvents:
this.eventBus.ofType(InvoiceCreatedEvent).subscribe((event) => { if (event.previousInvoice) { // This means a new invoice has been created for an order that already had an invoice // You should send an email to the customer with the new invoice and the credit invoice. sendEmail( `Your order was changed, so we've credited invoice ${event.previousInvoice.invoiceNumber} with ${event.creditInvoice} and created a new invoice ${event.newInvoice.invoiceNumber} for your order ${event.order.code}` ); } else { // If no event.previousInvoice is defined, this is the first invoice created, and you can use the download link in your order confirmation email }});Credit invoices use the same template as regular invoices, so make sure to handle credit invoice data. Checkout the default template for an example on how to use it for credit invoices.
Credit invoices will receive additional data with the default loadDataFn(). This data is needed to create valid credit invoices:
{ orderDate, invoiceNumber: newInvoiceNumber, isCreditInvoice: true, // Reference to original invoice is often mandatory for credit invoices originalInvoiceNumber: previousInvoice.invoiceNumber, // The order totals are reversed, meaning that if the order total was $100, it will now be -$100, because this is a credit invoice. order: { ...order, total: reversedOrderTotals.total, totalWithTax: reversedOrderTotals.totalWithTax, taxSummary: reversedOrderTotals.taxSummaries,},To disable the credit invoice behaviour:
InvoicePlugin.init({ // Used for generating download URLS for the admin ui vendureHost: 'http://localhost:3106', }),Increase invoice template DB storage
Section titled “Increase invoice template DB storage”By default, the plugin uses TypeOrm’s text to store the invoice template in the DB. This might not be enough, for example when you’d like to add base64 encoded images to your invoices. This will result in the error ER_DATA_TOO_LONG: Data too long for column 'templateString'. You can specify your DB engine with an env variable, and the plugin will resolve the correct column type:
# E.g. For mysql the column type 'longtext' will be used, which supports up to 4gbINVOICES_PLUGIN_DB_ENGINE=mysqlDon’t forget to run a DB migration: This will delete any data in the templateString column!
Checkout https://orkhan.gitbook.io/typeorm/docs/entities for available databases and column types.
Google Storage strategy
Section titled “Google Storage strategy”This plugin also includes a strategy for storing invoices in Google Storage:
yarn add @google-cloud/storage
// In vendure-config.tsInvoicePlugin.init({ vendureHost: 'http://localhost:3050', storageStrategy: new GoogleStorageInvoiceStrategy({ bucketName: 'bucketname', }),});- Enable the service account IAM in Google Cloud Console
- Add role ‘Service account token creator’ to the Cloud Run service account
The strategy will use the projectId and credentials in from your environment, which is useful for Google Cloud Run or Cloud Functions.
However, if you want to run it locally or on a custom environment, you need to pass a keyFile to the plugin. This is needed to generate signedUrls, which are used to give customers temporary access to a file on Storage. More info about locally using signedUrls: https://github.com/googleapis/nodejs-storage/issues/360
import {  InvoicePlugin,  GoogleStorageInvoiceStrategy,} from 'vendure-plugin-invoices';
InvoicePlugin.init({  vendureHost: 'http://localhost:3050',  storageStrategy: new GoogleStorageInvoiceStrategy({    bucketName: 'bucketname',    storageOptions: {      keyFilename: 'key.json',    },  }),});
Amazon S3 Storage strategy
Section titled “Amazon S3 Storage strategy”This plugin also includes a strategy for storing invoices on Amazon S3.
yarn add aws-sdk
import { InvoicePlugin, S3StorageStrategy } from 'vendure-plugin-invoices';
InvoicePlugin.init({  vendureHost: 'http://localhost:3050',  storageStrategy: new S3StorageStrategy({    expiresInSeconds: 360,    /**     * Config here will be passed directly to `new AWS.S3()`     * See https://www.npmjs.com/package/aws-sdk for more info     */  }),});
Custom file storage
Section titled “Custom file storage”Implement your own strategy for storing invoices by implementing one of these interfaces:
Remote storage strategy
Section titled “Remote storage strategy”RemoteStorageStrategy for storing PDF files on an external platform like Google Cloud or S3. It redirects the user to
a public/authorized URL for the user to download the invoice PDF.
import { RemoteStorageStrategy, zipFiles } from 'vendure-plugin-invoices';
export class YourRemoteStrategy implements RemoteStorageStrategy {  async save(    tmpFile: string,    invoiceNumber: number,    channelToken: string  ): Promise<string> {    // Save the invoice in your favorite cloud storage. The string you return will be saved as unique reference to your invoice.    // You should be able to retrieve the file later with just the unique reference    return 'unique-reference';  }
  async getPublicUrl(invoice: InvoiceEntity): Promise<string> {    // Most cloud based storages have the ability to generate a signed URL, which is available for X amount of time.    // This way the downloading of invoices does not go through the vendure service    return 'https://your-signed-url/invoice.pdf';  }
  async streamMultiple(    invoices: InvoiceEntity[],    res: Response  ): Promise<ReadStream> {    // zip files and return stream    const zipped = zipFiles(files);    return createReadStream(zipped);  }}
Local file storage
Section titled “Local file storage”LocalFileStrategy streams the invoice through the Vendure service to the user.
import { LocalStorageStrategy, zipFiles } from 'vendure-plugin-invoices';
export class YourLocalStrategy implements LocalStorageStrategy {  async save(tmpFile: string, invoiceNumber: number, channelToken: string) {    // save the tmpFile somewhere    return 'new/path.pdf';  }
  async streamMultiple(    invoices: InvoiceEntity[],    res: Response  ): Promise<ReadStream> {    // make a zip of your files    const zipFile = await zipFiles(files);    return createReadStream(zipFile);  }
  async streamFile(invoice: InvoiceEntity, res: Response): Promise<ReadStream> {    // stream a single PDF to the user    return createReadStream(invoice.storageReference);  }}
Custom invoice numbering and custom template data
Section titled “Custom invoice numbering and custom template data”Implement a custom loadDataFn to pass custom data into your template or generate custom invoice numbers:
InvoicePlugin.init({ vendureHost: 'http://localhost:3050', loadDataFn: async ( ctx, injector, order, mostRecentInvoiceNumber?, shouldGenerateCreditInvoice? ) => { // Increase order number let newInvoiceNumber = mostRecentInvoiceNumber || 0; newInvoiceNumber += 1; const orderDate = order.orderPlacedAt ? new Intl.DateTimeFormat('nl-NL').format(order.orderPlacedAt) : new Intl.DateTimeFormat('nl-NL').format(order.updatedAt); if (shouldGenerateCreditInvoice) { // Create credit invoice const { previousInvoice, reversedOrderTotals } = shouldGenerateCreditInvoice; return { orderDate, invoiceNumber: newInvoiceNumber, isCreditInvoice: true, // Reference to original invoice because this is a credit invoice originalInvoiceNumber: previousInvoice.invoiceNumber, order: { ...order, total: reversedOrderTotals.total, totalWithTax: reversedOrderTotals.totalWithTax, taxSummary: reversedOrderTotals.taxSummaries, }, }; } else { // Normal debit invoice return { orderDate, invoiceNumber: newInvoiceNumber, order: order, }; } } }),Make sure to return the data needed for credit invoices when shouldGenerateCreditInvoice is defined.
You can access this data in your HTML template using Handlebars.js:
<h1>{{ someCustomField }}</h1>Exporting to external accounting platforms
Section titled “Exporting to external accounting platforms”You can automatically export each created invoice to an accounting platform by including an accounting strategy in the plugin. See one of the examples below for more details.
Xero UK
Section titled “Xero UK”This strategy exports each invoice to Xero (UK only). To get started:
- Create an OAuth app by clicking ‘New app’ here: https://developer.xero.com/app/manage
- This integration uses ‘Custom connection’, because we are syncing data from machine to machine. See this page for more details on app types.
- Select the scopes
accounting.transactions,accounting.contactsandaccounting.settings.read. - Get your client ID and client secret, and pass them into the plugin like so:
InvoicePlugin.init({ vendureHost: 'http://localhost:3050', storageStrategy: new LocalFileStrategy(), accountingExports: [ // Export each invoice to Xero new XeroUKExportStrategy({ clientId: process.env.XERO_CLIENT_ID, clientSecret: process.env.XERO_CLIENT_SECRET, // The Xero account number for shipping costs shippingAccountCode: '0103', // The Xero account number for product sales salesAccountCode: '0102', // You can customize the "reference" field for the Xero entry with this function getReference: (order, invoice, isCreditInvoiceFor) => { if (isCreditInvoiceFor) { return `Credit note for ${isCreditInvoiceFor}`; } else { return `some custom reference` } }, // Specifying a channel token will only use this strategy for that channel channelToken: 'your-channel-token' }), ], }),npm install xero-nodeto install the Xero NodeJS client.
If you are getting { error: 'invalid_client' } during startup, you might have to recreate your Xero app on https://developer.xero.com/app/manage.
Custom accounting strategy
Section titled “Custom accounting strategy”You can implement your own export strategy to export invoices to your custom accounting platform. Take a look at the included XeroUKExportStrategy as an example.
Migrating from V1 to V2 of this plugin
Section titled “Migrating from V1 to V2 of this plugin”- Always create a backup of your database
- Install the plugin and generate a migration
- In your migration file, add the function
migrateInvoices(queryRunner)to the bottom of theupfunction in your migration file, like so
import {migrateInvoices} from "@pinelab/vendure-plugin-invoices";
   public async up(queryRunner: QueryRunner): Promise<any> {        await queryRunner.query("ALTER TABLE `invoice` DROP COLUMN `orderCode`", undefined);        await queryRunner.query("ALTER TABLE `invoice` DROP COLUMN `customerEmail`", undefined);        await queryRunner.query("ALTER TABLE `invoice_config` ADD `createCreditInvoices` tinyint NOT NULL DEFAULT 1", undefined);        await queryRunner.query("ALTER TABLE `invoice` ADD `orderTotals` text NULL", undefined);
// Add this line await migrateInvoices(queryRunner); }- Run the migration.